Search for:
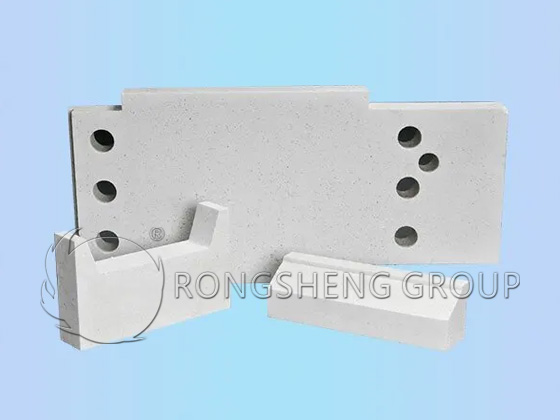
Causes and Preventive Measures for Cracking in Glass Kiln Lip Bricks

Glass Kiln Lip Bricks are a relatively special type of irregularly shaped refractory material. Their service life is affected by every aspect, including the raw material composition, forming and manufacturing process, and assembly. Especially during the hammering and ignition processes, the bricks must withstand temperature differences of hundreds of degrees Celsius. Therefore, whether using a single brick or combining several lip bricks, cracking is a potential problem. The causes of cracking in lip bricks and preventative measures are listed below.

Refractory Bricks for Glass Furnaces

Free Quote

    Free Quote

    Your Name (required)


    Your Email (required)

    Your Phone

    Required Products (required)

    Enquiry Information

    • ① The brick material itself has low compressive strength, poor thermal stability, and a high coefficient of thermal expansion. When subjected to thermal shock, the tensile strength of the brick is less than the expansion thermal stress, causing it to break. To eliminate this factor, in addition to designing a good formula and selecting good materials, the contact surfaces between the fixing screws and the retaining iron used to fix the lip brick and the lip brick should be padded with flexible material, and the iron parts should not directly contact the brick body.
    • ② The firing temperature is low, and the dehydration stage of crystal water is short. During the high-temperature dehydration process of the crystal water inside the brick body, the original structure is destroyed and new minerals are generated. To avoid this situation, in addition to avoiding components with a large amount of mineral structural water when determining the lip brick formula, the brick blank must be fully dried after casting before being fired in the kiln. Furthermore, the heat preservation time should be increased in the dehydration temperature range of crystal water according to the mineral composition.
    • ③ The lip brick is backed by the tail brick, and there are fixing screws on the front and sides acting on the brick body. When heated, forces from four directions act on the local area of ​​the brick body. The fixing screws restrict the expansion and movement of the brick body, but they can also easily cause the brick body to crack under external forces. Preventive Measures: After the lip brick is fixed to the overflow port support, secure the support with jacking screws and bolts, but do not tighten it completely; leave an expansion gap. Then, heat it with fire, slowly raising the temperature to above 700℃ to allow the lip brick to fully expand. Tighten the jacking screws again before the lead-in.
    • ④ Insufficient pre-use baking time prevents the removal of free water from the brick. To eliminate this factor, place the lip brick in a high-temperature environment before use to fully remove free water, or preheat the kiln during on-site construction.
    • ⑤ Using deformed lip brick supports may cause cracks or even breakage of the lip brick. Therefore, deformed lip brick supports, especially those with deformed contact surfaces with the lip brick, should not be used.

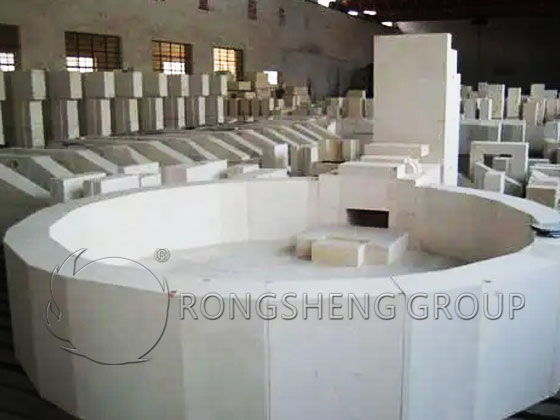
    Lip Brick Replacement

    After a period of operation in a rolled glass production line, if defects appear in the glass due to erosion or wear of the lip brick, it needs to be replaced.

    Before replacing the lip brick, it must be baked at a high temperature for at least 72 hours to remove free water remaining in the brick due to processing, transportation, or other reasons. Baking can be done using a natural drying method: the brick is placed next to the kiln, relying on the heat emitted by the kiln for baking. Because it is natural baking, it requires a long time and can only remove some free water, so the baking is not thorough. Alternatively, a preheating furnace baking method can be used. A kiln is built with refractory materials, and the lip brick is heated according to a heating curve, baked at 200-300℃ for 24 hours, and then assembled to the overflow port. After the calender is positioned and installed, the temperature is further increased to 1100℃ for the lead-in operation. This method requires specialized hoisting and installation tools. It is also more difficult to operate at high temperatures, but it ensures that the lip brick will not crack. Online baking can also be used: after the lip brick and calender are positioned and installed at the forming port, they are baked using a spray gun. This method uses gradual heating, allowing sufficient time for the free water and crystal water in the lip brick to be fully drained. This method reduces the probability of the lip brick cracking or even shattering.

    Before replacing the lip brick, prepare the following tools: pipe wrench, Allen wrench, wrench, pliers, level, measuring tape, 1-3mm sheet metal, square timber, mullite fiber paper, etc.

    When removing the lip brick from the calender, first use a sledgehammer and pneumatic hammer to remove the old lip brick. Then, use an electric scraper to clean the tail brick thoroughly, ensuring there is no residual glass or unevenness on the surface. After applying a 3-5mm thick layer of high-temperature mullite fiber paper to the contact surface of the tail brick, assemble the lip brick on the lip brick support as required, or install the lip brick already assembled on the support at the tail brick location. Finally, push the calender into position, check for any problems, and then slowly heat the lip brick to the guide plate with a spray gun to complete the replacement operation.

      Get Free Quote

      Your Name (required)

      Your Email (required)

      Your Phone

      Required Products (required)

      Enquiry Information

      Splicing of Glass Kiln Lip Bricks

      Glass Kiln Lid Bricks used in rolled glass forming can be made from a single piece or from several bricks joined together. The choice between a single brick and several bricks depends on many subjective and objective factors, such as brick quality, brick cost, production cycle, glass specifications, and operator skill level. The basic principle is to ensure product quality, prevent defects during use, and guarantee durability.

      Glass Kiln Lip Bricks
      Glass Kiln Lip Bricks

      Free Quote

        Free Quote

        Your Name (required)


        Your Email (required)

        Your Phone

        Required Products (required)

        Enquiry Information

        Solid Lid Brick

        The length of the solid lip brick is determined by the length of the calendering roll. The advantages of using a solid lip brick are:

        1. Not limited by glass specifications, meeting the cutting needs of various glass sizes;
        2. Good stability during operation, with virtually no displacement or tilting;
        3. Compact, stable, and robust assembly with the support structure.

        The disadvantages are: It is prone to breakage, with severe cases showing 4-5 cracks. The brick is relatively long and heavy, and assembly and transportation are inconvenient due to space constraints.

        Two Lip Bricks Joined Together

        A set of lip bricks consists of two pieces joined together, each piece being half the length of the calendering roll.

        The advantages of using two pieces are:

        1. It distributes the various forces acting on the lip brick, reducing the probability of cracking;
        2. Each brick is lighter, making assembly, transportation, and movement easier.

        However, using two pieces together has many disadvantages, including:

        1. It is difficult to guarantee the quality of the assembly, mainly due to larger joints between the bricks and the tendency for misalignment to occur on the upper surface of the lip brick, resulting in overall unevenness;
        2. During operation, the brick joints often widen, tilt, shift, or even misalign;
        3. The assembly process is time-consuming and labor-intensive.

        There are three methods for splicing two lip bricks together:

        • Method 1: Make semi-circular grooves downwards on both sides of the splicing surface of the lip bricks, 10mm from the top plane of the lip. After splicing the two bricks, the semi-circular grooves on both sides will form a circular hole. Fill the hole with mortar, ensuring it is completely filled. After fixing both sides, place it near the kiln and bake at high temperature for a period of time. At this point, the refractory mortar inside the hole will have dried and solidified. If the bricks expand when heated, the resulting cylindrical refractory material will not fall off, sealing the joint between the two bricks. Therefore, no air enters, reducing the release of air bubbles and minimizing the impact on the temperature of the surrounding molten glass.
        • Method 2: Soak ceramic fiber paper (<1mm thick) in molten glass, then apply it to one side of the lip brick, and then align them together. After completion, bake it near the kiln.
        • Method 3: Dry splicing. Join two well-fitting lip bricks together, ensuring the gap between them is less than 1mm, and then tighten them with screws on both sides before use.

        Three-Piece Lip Brick Assembly

        A set of lip bricks consists of three pieces joined together. The middle piece is 2-2.2m long, and each of the two ends has a lip brick joint of 250-350mm.

        Advantages:

        1. The two joints release more of the compressive force generated by the expansion of the lip bricks, reducing the probability of cracking.
        2. The length of the middle brick can meet the production needs of various glass sizes.

        Disadvantages:

        1. The structure is unstable, making it difficult to guarantee the quality of the splicing. Misalignment on the upper surface of the lip bricks at the joints can make expansion and contraction of the glass difficult.
        2. There is a possibility of tilting or displacement during operation.
        3. More fastener installation work is required during online assembly, resulting in a longer cycle time.

        Whether used as a single piece or in combination of multiple lip bricks, the lip bricks must be assembled, installed, and fixed to a support frame. Production lines using brick-making calenders initially employed online assembly. However, after a period of trial and error, it was found that online assembly was neither convenient nor guaranteed in terms of quality. Therefore, many companies now use offline assembly, where the assembled bricks are transported to the overflow port by a mobile trolley and installed at the outlet. Production lines using integrated brick-making calenders also use offline assembly, where the lip bricks are assembled and fixed to a support frame outside the production line, and then hoisted and installed as a whole onto the calender frame.

        When assembling lip bricks, the upper flat working surface serves as the reference horizontal plane. By processing the brick material or adding leveling shims at the bottom, the lip brick is ensured to be horizontal, with its contact surface with the tail brick perpendicular to the horizontal surface. The joint between lip bricks must be straight and as small as possible, less than 1mm after assembly. There should be no misalignment of the lip brick tips; the tips should be kept in a straight line along the tangent direction. The curved surfaces of the assembled bricks must be on the same plane, without any misalignment or stepped formations. Mullite fiber paper must be used to separate the lip brick from the tail brick, the lip brick from the edge brick, and the lip brick from the support. The center longitudinal direction of the lip brick should be aligned with the production line, the tangent direction parallel to the edge, and the normal direction perpendicular to the top plane of the lip brick.

        Online assembly of lip bricks involves high-temperature operation in a confined area. Besides the long operation time (approximately 1-2 hours), the assembly quality of the lip bricks and supports, and the supports and calenders, is inferior to offline assembly. It also negatively impacts the kiln temperature regime.

        Offline assembly offers a better working environment, lower labor intensity for workers, and doesn’t interfere with brick-changing time. It allows ample time and space for assembly, enabling precise positioning of the lip brick’s front-to-back and left-to-right spacing with the rollers. If bricks or steel components are unsuitable, they can be processed offline, ensuring the assembly quality of the lip bricks and supports, and the supports and calenders, saving brick loading time. Brick changing can be completed quickly with minimal kiln temperature changes, facilitating rapid production recovery. However, once the integrated brick-making calender is positioned, the relative position of the tail brick cannot be moved, lacking a means to handle defects. In actual production, damage can occur on both sides during the lead-in operation, especially for those accustomed to using a pull-in lead-in system. Once the edge is damaged, the machine must be replaced, and the tail brick must be replaced along with the lead-in brick. Separating the lip brick and tail brick involves long working hours, a poor working environment, and high labor intensity. The heat-resistant steel lip brick support integrated with the brick machine has poor deformation resistance, is prone to bending at high temperatures, and is difficult to restore for reuse after deformation, resulting in waste.

          Get Free Quote

          Your Name (required)

          Your Email (required)

          Your Phone

          Required Products (required)

          Enquiry Information